day1
1. JDBC基本概念
2. 快速入门
3. 对JDBC中各个接口和类详解
JDBC:
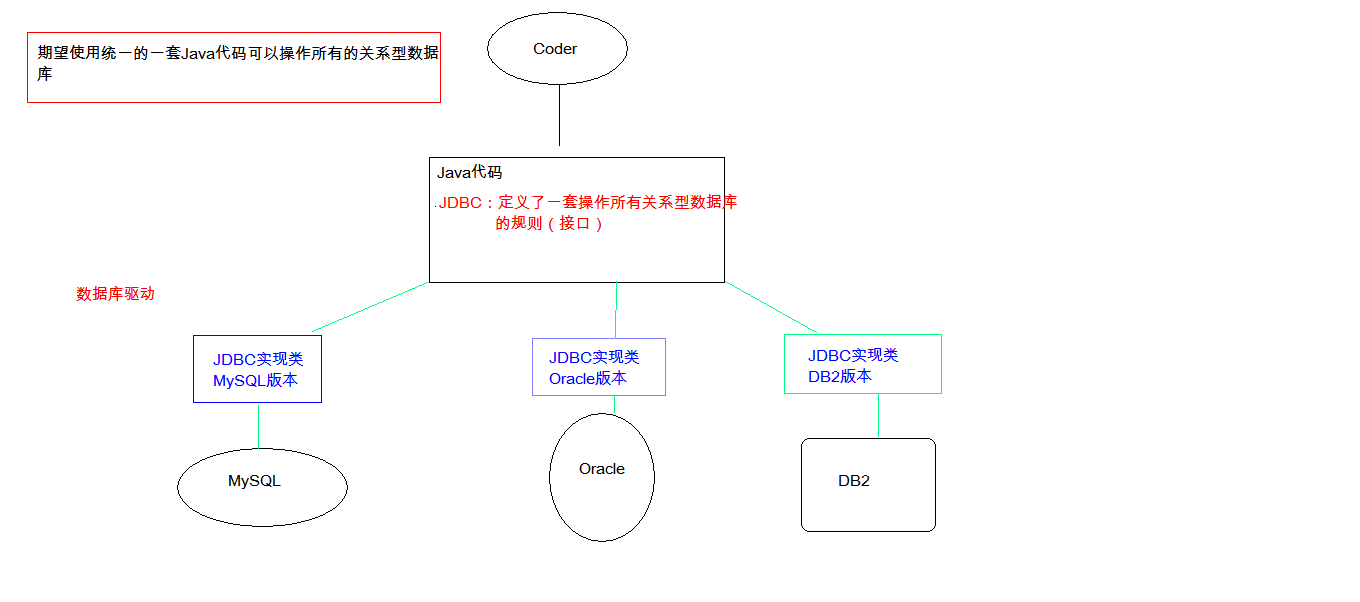
概念:Java DataBase Connectivity Java 数据库连接, Java语言操作数据库
JDBC本质:其实是官方(sun公司)定义的一套操作所有关系型数据库的规则,即接口。各个数据库厂商去实现这套接口,提供数据库驱动jar包。我们可以使用这套接口(JDBC)编程,真正执行的代码是驱动jar包中的实现类。
快速入门:
步骤:
- 导入驱动jar包 mysql-connector-java-5.1.37-bin.jar
1.复制mysql-connector-java-5.1.37-bin.jar到项目的libs目录下
2.右键–>Add As Library - 注册驱动
- 获取数据库连接对象 Connection
- 定义sql
- 获取执行sql语句的对象 Statement
- 执行sql,接受返回结果
- 处理结果
- 释放资源
- 导入驱动jar包 mysql-connector-java-5.1.37-bin.jar
代码实现(jdbc_demo 已经实现完成):
网址:https://www.runoob.com/java/java-mysql-connect.html
1
2
3
4
5
6
7
8
9
10
11
12
13
14
15
16
//1. 导入驱动jar包
//2.注册驱动
Class.forName("com.mysql.jdbc.Driver");
//3.获取数据库连接对象
Connection conn = DriverManager.getConnection("jdbc:mysql://localhost:3306/db3", "root", "root");
//4.定义sql语句
String sql = "update account set balance = 500 where id = 1";
//5.获取执行sql的对象 Statement
Statement stmt = conn.createStatement();
//6.执行sql
int count = stmt.executeUpdate(sql);
//7.处理结果
System.out.println(count);
//8.释放资源
stmt.close();
conn.close();
详解各个对象(面向接口):
DriverManager:驱动管理对象
功能:
注册驱动:告诉程序该使用哪一个数据库驱动jar包
static void registerDriver(Driver driver) :注册与给定的驱动程序 DriverManager 。
写代码使用: Class.forName(“com.mysql.jdbc.Driver”);
通过查看源码发现:在com.mysql.jdbc.Driver类中存在静态代码块1
2
3
4
5
6
7static {
try {
java.sql.DriverManager.registerDriver(new Driver());
} catch (SQLException E) {
throw new RuntimeException("Can't register driver!");
}
}注意:mysql5之后的驱动jar包可以省略注册驱动的步骤。
获取数据库连接:
- 方法:static Connection getConnection(String url, String user, String password)
- 参数:
- url:指定连接的路径
* 语法:jdbc:mysql://ip地址(域名):端口号/数据库名称 * 例子:jdbc:mysql://localhost:3306/db3 * 细节:如果连接的是本机mysql服务器,并且mysql服务默认端口是3306,则url可以简写为:jdbc:mysql:///数据库名称 - user:用户名
- password:密码
- url:指定连接的路径
Connection:数据库连接对象
- 功能:
- 获取执行sql 的对象
- Statement createStatement()
- PreparedStatement prepareStatement(String sql)
- 管理事务:
- 开启事务:setAutoCommit(boolean autoCommit) :调用该方法设置参数为false,即开启事务
- 提交事务:commit()
- 回滚事务:rollback()
- 获取执行sql 的对象
- 功能:
Statement:执行sql的对象
执行sql
boolean execute(String sql):可以执行任意的sql 了解- int executeUpdate(String sql) :执行DML(insert、update、delete)语句、DDL(create,alter、drop)语句
- 返回值:影响的行数,可以通过这个影响的行数判断DML语句是否执行成功 返回值>0的则执行成功,反之,则失败。
- ResultSet executeQuery(String sql) :执行DQL(select)语句
练习:
account表 添加一条记录
account表 修改记录
account表 删除一条记录
代码:
1
2
3
4
5
6
7
8
9
10
11
12
13
14
15
16
17
18
19
20
21
22
23
24
25
26
27
28
29
30
31
32
33
34
35
36
37
38
39
40
41
42
43
44
45
Statement stmt = null;
Connection conn = null;
try {
//1. 注册驱动
Class.forName("com.mysql.jdbc.Driver");
//2. 定义sql
String sql = "insert into account values(null,'王五',3000)";
//3.获取Connection对象
conn = DriverManager.getConnection("jdbc:mysql:///db3", "root", "root");
//4.获取执行sql的对象 Statement
stmt = conn.createStatement();
//5.执行sql
int count = stmt.executeUpdate(sql);//影响的行数
//6.处理结果
System.out.println(count);
if(count > 0){
System.out.println("添加成功!");
}else{
System.out.println("添加失败!");
}
} catch (ClassNotFoundException e) {
e.printStackTrace();
} catch (SQLException e) {
e.printStackTrace();
}finally {
//stmt.close();
//7. 释放资源
//避免空指针异常
if(stmt != null){
try {
stmt.close();
} catch (SQLException e) {
e.printStackTrace();
}
}
if(conn != null){
try {
conn.close();
} catch (SQLException e) {
e.printStackTrace();
}
}
}
1
2
3
4
5
6
7
8
9
10
11
12
13
14
15
16
17
18
19
20
21
22
23
24
25
26
27
28
29
30
31
32
33
34
35
36
37
38
39
40
41
42
43
44
45
46
47
48
49
50
51
52
53
54
55
56
57
58
59
60
package cn.itcast.jdbc;
import java.sql.Connection;
import java.sql.DriverManager;
import java.sql.SQLException;
import java.sql.Statement;
/**
* account表 修改记录
*/
public class JDBCDemo3 {
public static void main(String[] args) {
Connection conn = null;
Statement stmt = null;
try {
//1. 注册驱动
Class.forName("com.mysql.jdbc.Driver");
//2.获取连接对象
conn = DriverManager.getConnection("jdbc:mysql:///db3", "root", "root");
//3.定义sql
String sql = "update account set balance = 1500 where id = 3";
//4.获取执行sql对象
stmt = conn.createStatement();
//5.执行sql
int count = stmt.executeUpdate(sql);
//6.处理结果
System.out.println(count);
if(count > 0){
System.out.println("修改成功!");
}else{
System.out.println("修改失败");
}
} catch (ClassNotFoundException e) {
e.printStackTrace();
} catch (SQLException e) {
e.printStackTrace();
} finally {
//7.释放资源
if(stmt != null){
try {
stmt.close();
} catch (SQLException e) {
e.printStackTrace();
}
}
if(conn != null){
try {
conn.close();
} catch (SQLException e) {
e.printStackTrace();
}
}
}
}
}
1
2
3
4
5
6
7
8
9
10
11
12
13
14
15
16
17
18
19
20
21
22
23
24
25
26
27
28
29
30
31
32
33
34
35
36
37
38
39
40
41
42
43
44
45
46
47
48
49
50
51
52
53
54
55
56
57
58
59
60
61
62
package cn.itcast.jdbc;
import cn.itcast.util.JDBCUtils;
import java.sql.Connection;
import java.sql.DriverManager;
import java.sql.SQLException;
import java.sql.Statement;
/**
* account表 删除一条记录
*/
public class JDBCDemo4 {
public static void main(String[] args) {
Connection conn = null;
Statement stmt = null;
try {
//1. 注册驱动
Class.forName("com.mysql.jdbc.Driver");
//2.获取连接对象
conn = DriverManager.getConnection("jdbc:mysql:///db3", "root", "root");
//conn = JDBCUtils.getConnection("jdbc:mysql:///db3", "root", "root");
//3.定义sql
String sql = "delete from account where id = 3";
//4.获取执行sql对象
stmt = conn.createStatement();
//5.执行sql
int count = stmt.executeUpdate(sql);
//6.处理结果
System.out.println(count);
if(count > 0){
System.out.println("删除成功!");
}else{
System.out.println("删除失败");
}
} catch (ClassNotFoundException e) {
e.printStackTrace();
} catch (SQLException e) {
e.printStackTrace();
} finally {
//7.释放资源
if(stmt != null){
try {
stmt.close();
} catch (SQLException e) {
e.printStackTrace();
}
}
if(conn != null){
try {
conn.close();
} catch (SQLException e) {
e.printStackTrace();
}
}
}
}
}
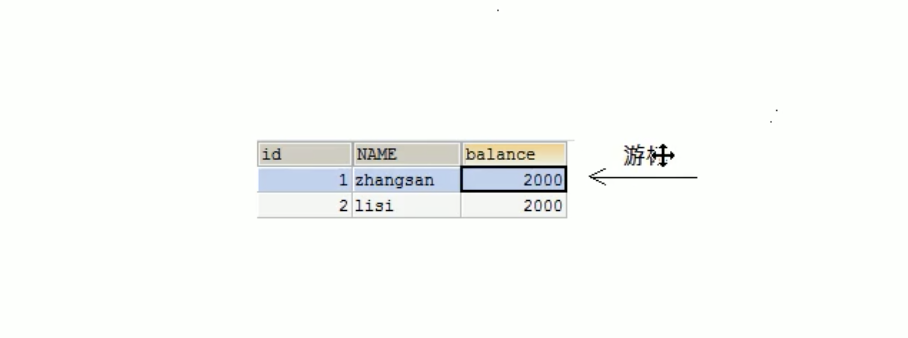
4. ResultSet:结果集对象,封装查询结果
* boolean next(): 游标向下移动一行,判断当前行是否是最后一行末尾(是否有数据),如果是,则返回false,如果不 是则返回true
* 
* getXxx(参数):获取数据
* Xxx:代表数据类型 如: int getInt() , String getString()
* 参数:
1. int:代表列的编号,从1开始 如: getString(1)
2. String:代表列名称。 如: getDouble("balance")
* 注意:
* 使用步骤:
1. 游标向下移动一行
2. 判断是否有数据
3. 获取数据
1
2
3
4
5
6
7
8
9
10
//循环判断游标是否是最后一行末尾。
while(rs.next()){
//获取数据
//6.2 获取数据
int id = rs.getInt(1);
String name = rs.getString("name");
double balance = rs.getDouble(3);
System.out.println(id + "---" + name + "---" + balance);
}
* 练习:
* 定义一个方法,查询emp表的数据将其封装为对象,然后装载集合,返回。
1. 定义Emp类
2. 定义方法 public List\<Emp> findAll(){}
3. 实现方法 select * from emp;
1
2
3
4
5
6
7
8
9
10
11
12
13
14
15
16
17
18
19
20
21
22
23
24
25
26
27
28
29
30
31
32
33
34
35
36
37
38
39
40
41
42
43
44
45
46
47
48
49
50
51
52
53
54
55
56
57
58
59
60
61
62
63
64
65
66
67
68
69
70
71
72
73
74
75
76
77
78
79
80
81
82
83
84
85
86
87
88
89
90
91
92
93
94
95
96
97
98
99
100
101
102
103
104
105
106
107
108
109
110
111
112
113
114
115
116
117
118
119
120
121
122
123
124
125
126
127
128
129
130
131
132
133
134
135
136
137
138
139
140
141
142
143
144
145
146
147
148
149
150
151
152
153
154
155
156
157
158
159
160
161
162
163
164
165
166
167
168
169
170
171
172
173
174
175
176
177
178
179
180
181
182
package cn.itcast.jdbc;
import cn.itcast.domain.Emp;
import cn.itcast.util.JDBCUtils;
import java.sql.*;
import java.util.ArrayList;
import java.util.List;
/**
* * 定义一个方法,查询emp表的数据将其封装为对象,然后装载集合,返回。
*/
public class JDBCDemo8 {
public static void main(String[] args) {
List<Emp> list = new JDBCDemo8().findAll2();
System.out.println(list);
System.out.println(list.size());
}
/**
* 查询所有emp对象
* @return
*/
public List<Emp> findAll(){
Connection conn = null;
Statement stmt = null;
ResultSet rs = null;
List<Emp> list = null;
try {
//1.注册驱动
Class.forName("com.mysql.jdbc.Driver");
//2.获取连接
conn = DriverManager.getConnection("jdbc:mysql:///db3", "root", "root");
//3.定义sql
String sql = "select * from emp";
//4.获取执行sql的对象
stmt = conn.createStatement();
//5.执行sql
rs = stmt.executeQuery(sql);
//6.遍历结果集,封装对象,装载集合
Emp emp = null;
list = new ArrayList<Emp>();
while(rs.next()){
//获取数据
int id = rs.getInt("id");
String ename = rs.getString("ename");
int job_id = rs.getInt("job_id");
int mgr = rs.getInt("mgr");
Date joindate = rs.getDate("joindate");
double salary = rs.getDouble("salary");
double bonus = rs.getDouble("bonus");
int dept_id = rs.getInt("dept_id");
// 创建emp对象,并赋值
emp = new Emp();
emp.setId(id);
emp.setEname(ename);
emp.setJob_id(job_id);
emp.setMgr(mgr);
emp.setJoindate(joindate);
emp.setSalary(salary);
emp.setBonus(bonus);
emp.setDept_id(dept_id);
//装载集合
list.add(emp);
}
} catch (ClassNotFoundException e) {
e.printStackTrace();
} catch (SQLException e) {
e.printStackTrace();
}finally {
if(rs != null){
try {
rs.close();
} catch (SQLException e) {
e.printStackTrace();
}
}
if(stmt != null){
try {
stmt.close();
} catch (SQLException e) {
e.printStackTrace();
}
}
if(conn != null){
try {
conn.close();
} catch (SQLException e) {
e.printStackTrace();
}
}
}
return list;
}
/**
* 演示JDBC工具类
* @return
*/
public List<Emp> findAll2(){
Connection conn = null;
Statement stmt = null;
ResultSet rs = null;
List<Emp> list = null;
try {
/* //1.注册驱动
Class.forName("com.mysql.jdbc.Driver");
//2.获取连接
conn = DriverManager.getConnection("jdbc:mysql:///db3", "root", "root");*/
conn = JDBCUtils.getConnection();
//3.定义sql
String sql = "select * from emp";
//4.获取执行sql的对象
stmt = conn.createStatement();
//5.执行sql
rs = stmt.executeQuery(sql);
//6.遍历结果集,封装对象,装载集合
Emp emp = null;
list = new ArrayList<Emp>();
while(rs.next()){
//获取数据
int id = rs.getInt("id");
String ename = rs.getString("ename");
int job_id = rs.getInt("job_id");
int mgr = rs.getInt("mgr");
Date joindate = rs.getDate("joindate");
double salary = rs.getDouble("salary");
double bonus = rs.getDouble("bonus");
int dept_id = rs.getInt("dept_id");
// 创建emp对象,并赋值
emp = new Emp();
emp.setId(id);
emp.setEname(ename);
emp.setJob_id(job_id);
emp.setMgr(mgr);
emp.setJoindate(joindate);
emp.setSalary(salary);
emp.setBonus(bonus);
emp.setDept_id(dept_id);
//装载集合
list.add(emp);
}
} catch (SQLException e) {
e.printStackTrace();
}finally {
/*if(rs != null){
try {
rs.close();
} catch (SQLException e) {
e.printStackTrace();
}
}
if(stmt != null){
try {
stmt.close();
} catch (SQLException e) {
e.printStackTrace();
}
}
if(conn != null){
try {
conn.close();
} catch (SQLException e) {
e.printStackTrace();
}
}*/
JDBCUtils.close(rs,stmt,conn);
}
return list;
}
}
`封装Emp表数据的JavaBean`
1
2
3
4
5
6
7
8
9
10
11
12
13
14
15
16
17
18
19
20
21
22
23
24
25
26
27
28
29
30
31
32
33
34
35
36
37
38
39
40
41
42
43
44
45
46
47
48
49
50
51
52
53
54
55
56
57
58
59
60
61
62
63
64
65
66
67
68
69
70
71
72
73
74
75
76
77
78
79
80
81
82
83
84
85
86
87
88
89
90
91
92
93
94
95
96
97
98
99
package cn.itcast.domain;
import java.util.Date;
/**
* 封装Emp表数据的JavaBean
*/
public class Emp {
private int id;
private String ename;
private int job_id;
private int mgr;
private Date joindate;
private double salary;
private double bonus;
private int dept_id;
public int getId() {
return id;
}
public void setId(int id) {
this.id = id;
}
public String getEname() {
return ename;
}
public void setEname(String ename) {
this.ename = ename;
}
public int getJob_id() {
return job_id;
}
public void setJob_id(int job_id) {
this.job_id = job_id;
}
public int getMgr() {
return mgr;
}
public void setMgr(int mgr) {
this.mgr = mgr;
}
public Date getJoindate() {
return joindate;
}
public void setJoindate(Date joindate) {
this.joindate = joindate;
}
public double getSalary() {
return salary;
}
public void setSalary(double salary) {
this.salary = salary;
}
public int getDept_id() {
return dept_id;
}
public void setDept_id(int dept_id) {
this.dept_id = dept_id;
}
public double getBonus() {
return bonus;
}
public void setBonus(double bonus) {
this.bonus = bonus;
}
public String toString() {
return "Emp{" +
"id=" + id +
", ename='" + ename + '\'' +
", job_id=" + job_id +
", mgr=" + mgr +
", joindate=" + joindate +
", salary=" + salary +
", bonus=" + bonus +
", dept_id=" + dept_id +
'}';
}
}
5. PreparedStatement:执行sql的对象
1. SQL注入问题:在拼接sql时,有一些sql的特殊关键字参与字符串的拼接。会造成安全性问题
1. 输入用户随便,输入密码:a' or 'a' = 'a
2. sql:select * from user where username = 'fhdsjkf' and password = 'a' or 'a' = 'a'
2. 解决sql注入问题:使用PreparedStatement对象来解决
3. 预编译的SQL:参数使用?作为占位符
4. 步骤:
1. 导入驱动jar包 mysql-connector-java-5.1.37-bin.jar
2. 注册驱动
3. 获取数据库连接对象 Connection
4. 定义sql
* 注意:sql的参数使用?作为占位符。 如:select * from user where username = ? and password = ?;
5. 获取执行sql语句的对象 PreparedStatement Connection.prepareStatement(String sql)
6. 给?赋值:
* 方法: setXxx(参数1,参数2)
* 参数1:?的位置编号 从1 开始
* 参数2:?的值
7. 执行sql,接受返回结果,不需要传递sql语句
8. 处理结果
9. 释放资源
5. 注意:后期都会使用PreparedStatement来完成增删改查的所有操作
1. 可以防止SQL注入
2. 效率更高抽取JDBC工具类 : JDBCUtils
- 目的:简化书写
- 分析:
- 注册驱动也抽取
- 抽取一个方法获取连接对象
- 需求:不想传递参数(麻烦),还得保证工具类的通用性。
- 解决:配置文件
jdbc.propertiesurl= user= password=
- 抽取一个方法释放资源
代码实现:
1 |
|
练习:
需求:
- 通过键盘录入用户名和密码
- 判断用户是否登录成功
- select * from user where username = “” and password = “”;
- 如果这个sql有查询结果,则成功,反之,则失败
步骤:
创建数据库表 user
1
2
3
4
5
6
7
8
9CREATE TABLE USER(
id INT PRIMARY KEY AUTO_INCREMENT,
username VARCHAR(32),
PASSWORD VARCHAR(32)
);
INSERT INTO USER VALUES(NULL,'zhangsan','123');
INSERT INTO USER VALUES(NULL,'lisi','234');
2. 代码实现:1 | public class JDBCDemo9 { |
注意用preparedStatement来实现的JDBC避免sql注入的问题
1 | /** |
JDBC控制事务:
- 事务:一个包含多个步骤的业务操作。如果这个业务操作被事务管理,则这多个步骤要么同时成功,要么同时失败。
- 操作:
- 开启事务
- 提交事务
- 回滚事务
- 使用Connection对象来管理事务
- 开启事务:setAutoCommit(boolean autoCommit) :调用该方法设置参数为false,即开启事务
- 在执行sql之前开启事务
- 提交事务:commit()
- 当所有sql都执行完提交事务
- 回滚事务:rollback()
- 在catch中回滚事务
- 代码:
1 | package cn.itcast.jdbc; |
day2
1. 数据库连接池
2. Spring JDBC : JDBC Template数据库连接池
- 概念:其实就是一个**容器(集合)**,存放数据库连接的容器。当系统初始化好后,容器被创建,容器中会申请一些连接对象,当用户来访问数据库时,从容器中获取连接对象,用户访问完之后,会将连接对象归还给容器。
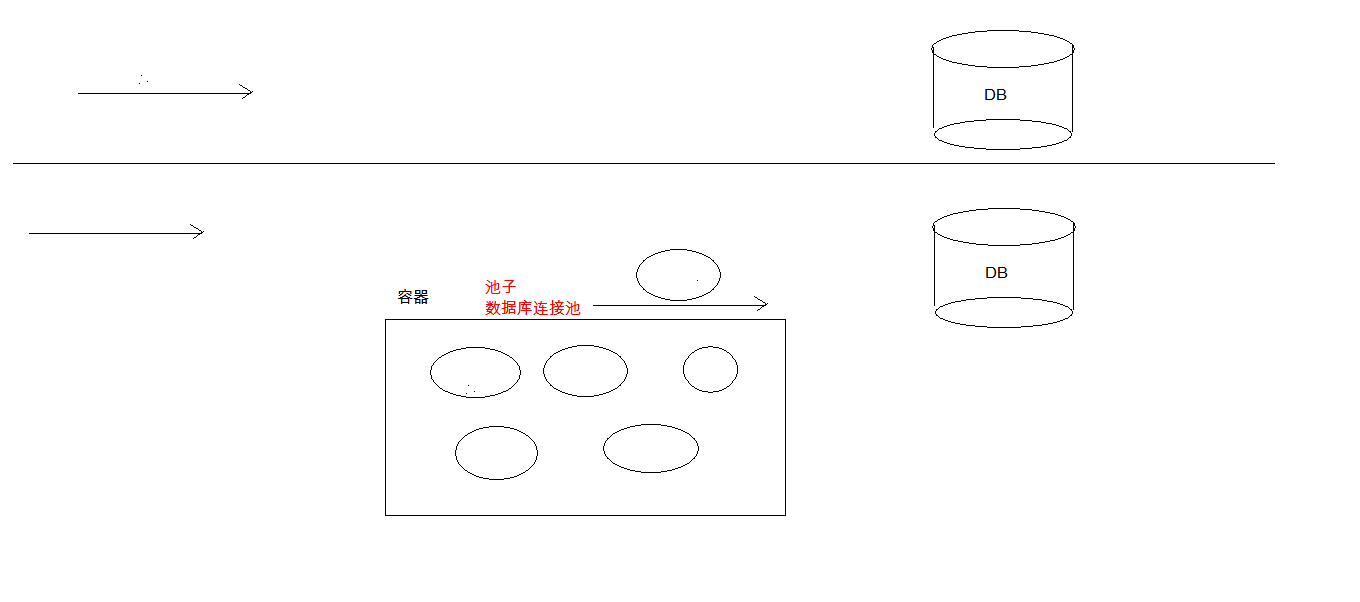
好处:
节约资源
用户访问高效
实现:
标准接口:DataSource javax.sql包下的
方法:
- 获取连接:getConnection()
- 归还连接:Connection.close()。如果连接对象Connection是从连接池中获取的,那么调用Connection.close()方法,则不会再关闭连接了。而是归还连接
一般我们不去实现它,有数据库厂商来实现
- C3P0:数据库连接池技术
- Druid:数据库连接池实现技术,由阿里巴巴提供的
C3P0:数据库连接池技术
步骤:
导入jar包 (两个) c3p0-0.9.5.2.jar mchange-commons-java-0.2.12.jar ,
- 不要忘记导入数据库驱动jar包
定义配置文件:
- 名称: c3p0.properties 或者 c3p0-config.xml
- 路径:直接将文件放在src目录下即可。
创建核心对象 数据库连接池对象 ComboPooledDataSource
获取连接: getConnection
代码:
1
2
3
4//1.创建数据库连接池对象
DataSource ds = new ComboPooledDataSource();
//2. 获取连接对象
Connection conn = ds.getConnection();
Druid:数据库连接池实现技术,由阿里巴巴提供的
- 步骤:
- 导入jar包 druid-1.0.9.jar
- 定义配置文件:
- 是properties形式的
- 可以叫任意名称,可以放在任意目录下
- 加载配置文件。Properties
- 获取数据库连接池对象:通过工厂来来获取 DruidDataSourceFactory
- 获取连接:getConnection
代码:
1
2
3
4
5
6
7
8//3.加载配置文件
Properties pro = new Properties();
InputStream is = DruidDemo.class.getClassLoader().getResourceAsStream("druid.properties");
pro.load(is);
//4.获取连接池对象
DataSource ds = DruidDataSourceFactory.createDataSource(pro);
//5.获取连接
Connection conn = ds.getConnection();
- 步骤:
2. 定义工具类
1. 定义一个类 JDBCUtils
2. 提供静态代码块加载配置文件,初始化连接池对象
3. 提供方法
1. 获取连接方法:通过数据库连接池获取连接
2. 释放资源
3. 获取连接池的方法1 | * 代码: |
Spring JDBC
Spring框架对JDBC的简单封装。提供了一个JDBCTemplate对象简化JDBC的开发
步骤:
导入jar包
创建JdbcTemplate对象。依赖于数据源DataSource
- JdbcTemplate template = new JdbcTemplate(ds);
调用JdbcTemplate的方法来完成CRUD的操作
- update():执行DML语句。增、删、改语句
- queryForMap():查询结果将结果集封装为map集合,将列名作为key,将值作为value 将这条记录封装为一个map集合
注意:这个方法查询的结果集长度只能是1
- queryForList():查询结果将结果集封装为list集合
- 注意:将每一条记录封装为一个Map集合,再将Map集合装载到List集合中
- query():查询结果,将结果封装为JavaBean对象
- query的参数:RowMapper
- 一般我们使用BeanPropertyRowMapper实现类。可以完成数据到JavaBean的自动封装
- new BeanPropertyRowMapper<类型>(类型.class)
- query的参数:RowMapper
- queryForObject:查询结果,将结果封装为对象
- 一般用于聚合函数的查询
练习:
需求:
- 修改1号数据的 salary 为 10000
- 添加一条记录
- 删除刚才添加的记录
- 查询id为1的记录,将其封装为Map集合
- 查询所有记录,将其封装为List
- 查询所有记录,将其封装为Emp对象的List集合
- 查询总记录数
代码:
1
2
3
4
5
6
7
8
9
10
11
12
13
14
15
16
17
18
19
20
21
22
23
24
25
26
27
28
29
30
31
32
33
34
35
36
37
38
39
40
41
42
43
44
45
46
47
48
49
50
51
52
53
54
55
56
57
58
59
60
61
62
63
64
65
66
67
68
69
70
71
72
73
74
75
76
77
78
79
80
81
82
83
84
85
86
87
88
89
90
91
92
93
94
95
96
97
98
99
100
101
102
103
104
105
106
107
108
109
110
111
112
113
114
115
116
117
118
119
120
121
122
123
124
125
126
127
128
129
130
131
132
133
134
135
136
137
138
139
import cn.itcast.domain.Emp;
import cn.itcast.utils.JDBCUtils;
import org.junit.Test;
import org.springframework.jdbc.core.BeanPropertyRowMapper;
import org.springframework.jdbc.core.JdbcTemplate;
import org.springframework.jdbc.core.RowMapper;
import java.sql.Date;
import java.sql.ResultSet;
import java.sql.SQLException;
import java.util.List;
import java.util.Map;
public class JdbcTemplateDemo2 {
//Junit单元测试,可以让方法独立执行
//1. 获取JDBCTemplate对象
private JdbcTemplate template = new JdbcTemplate(JDBCUtils.getDataSource());
/**
* 1. 修改1号数据的 salary 为 10000
*/
public void test1(){
//2. 定义sql
String sql = "update emp set salary = 10000 where id = 1001";
//3. 执行sql
int count = template.update(sql);
System.out.println(count);
}
/**
* 2. 添加一条记录
*/
public void test2(){
String sql = "insert into emp(id,ename,dept_id) values(?,?,?)";
int count = template.update(sql, 1015, "郭靖", 10);
System.out.println(count);
}
/**
* 3.删除刚才添加的记录
*/
public void test3(){
String sql = "delete from emp where id = ?";
int count = template.update(sql, 1015);
System.out.println(count);
}
/**
* 4.查询id为1001的记录,将其封装为Map集合
* 注意:这个方法查询的结果集长度只能是1
*/
public void test4(){
String sql = "select * from emp where id = ? or id = ?";
Map<String, Object> map = template.queryForMap(sql, 1001,1002);
System.out.println(map);
//{id=1001, ename=孙悟空, job_id=4, mgr=1004, joindate=2000-12-17, salary=10000.00, bonus=null, dept_id=20}
}
/**
* 5. 查询所有记录,将其封装为List
*/
public void test5(){
String sql = "select * from emp";
List<Map<String, Object>> list = template.queryForList(sql);
for (Map<String, Object> stringObjectMap : list) {
System.out.println(stringObjectMap);
}
}
/**
* 6. 查询所有记录,将其封装为Emp对象的List集合
*/
public void test6(){
String sql = "select * from emp";
List<Emp> list = template.query(sql, new RowMapper<Emp>() {
public Emp mapRow(ResultSet rs, int i) throws SQLException {
Emp emp = new Emp();
int id = rs.getInt("id");
String ename = rs.getString("ename");
int job_id = rs.getInt("job_id");
int mgr = rs.getInt("mgr");
Date joindate = rs.getDate("joindate");
double salary = rs.getDouble("salary");
double bonus = rs.getDouble("bonus");
int dept_id = rs.getInt("dept_id");
emp.setId(id);
emp.setEname(ename);
emp.setJob_id(job_id);
emp.setMgr(mgr);
emp.setJoindate(joindate);
emp.setSalary(salary);
emp.setBonus(bonus);
emp.setDept_id(dept_id);
return emp;
}
});
for (Emp emp : list) {
System.out.println(emp);
}
}
/**
* 6. 查询所有记录,将其封装为Emp对象的List集合
*/
public void test6_2(){
String sql = "select * from emp";
List<Emp> list = template.query(sql, new BeanPropertyRowMapper<Emp>(Emp.class));
for (Emp emp : list) {
System.out.println(emp);
}
}
/**
* 7. 查询总记录数
*/
public void test7(){
String sql = "select count(id) from emp";
Long total = template.queryForObject(sql, Long.class);
System.out.println(total);
}
}
- Post title:JDBC课堂笔记
- Post author:Yuxuan Wu
- Create time:2021-07-02 21:28:23
- Post link:yuxuanwu17.github.io2021/07/02/2021-07-03-JDBC课堂笔记/
- Copyright Notice:All articles in this blog are licensed under BY-NC-SA unless stating additionally.