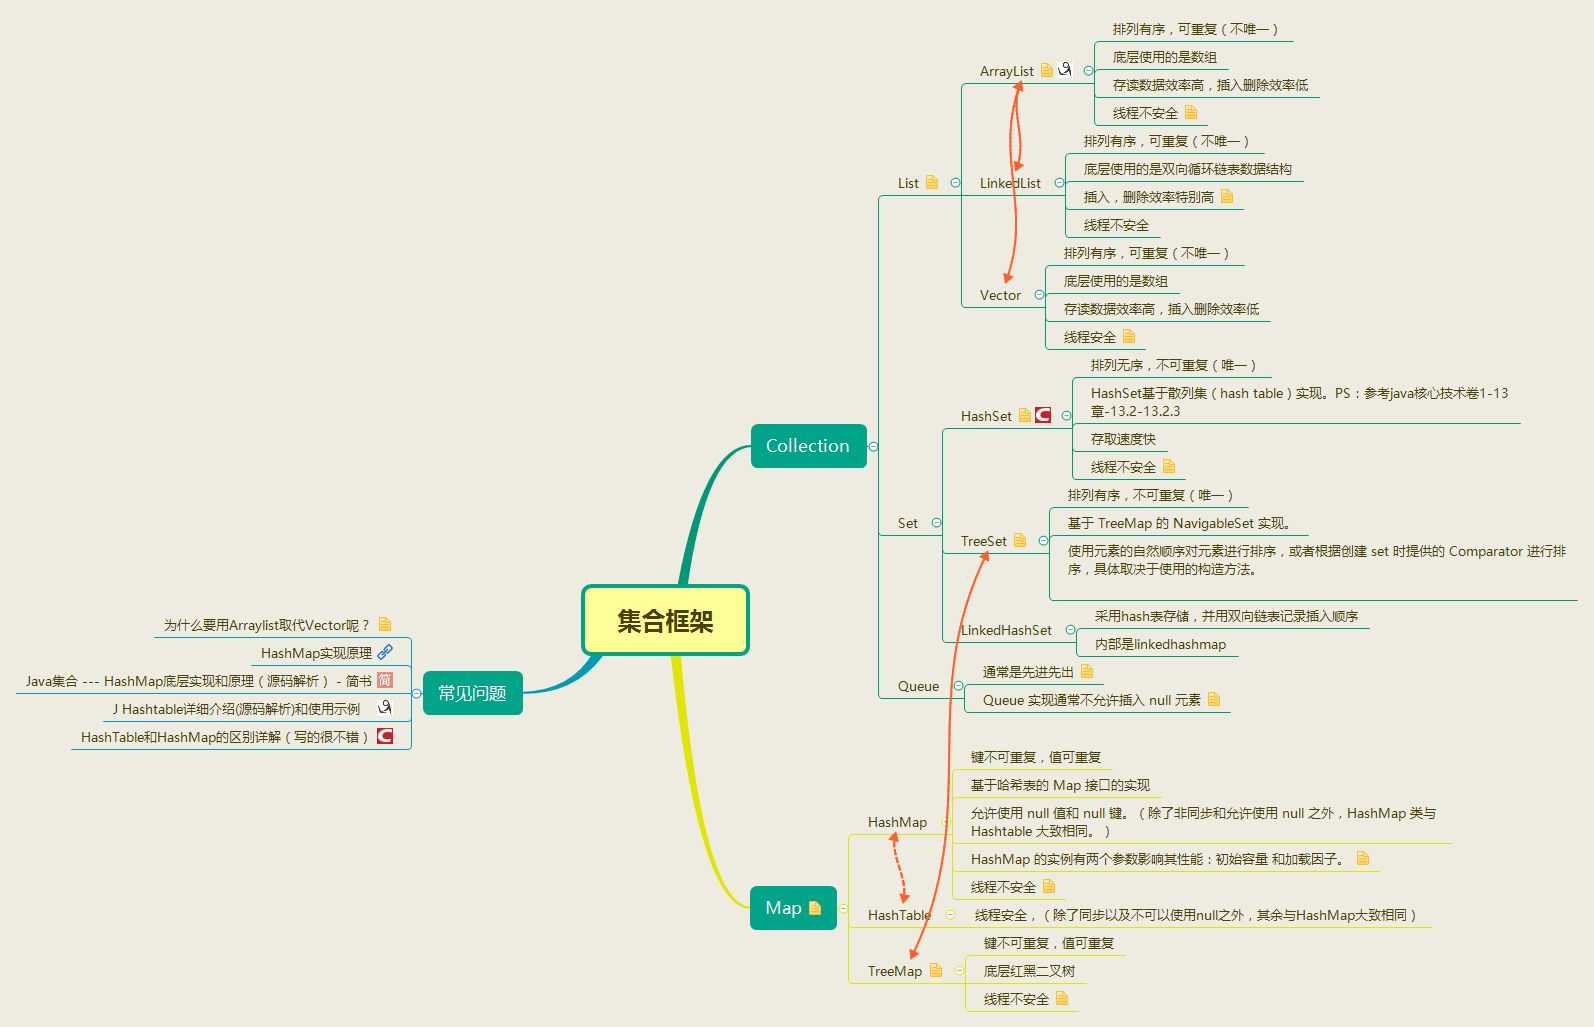
List、Set、数据结构、Collections 主要内容
数据结构
List集合
Set集合
Collections
教学目标
第一章 数据结构 2.1 数据结构有什么用? 当你用着java里面的容器类很爽的时候,你有没有想过,怎么ArrayList就像一个无限扩充的数组,也好像链表之类的。好用吗?好用,这就是数据结构的用处,只不过你在不知不觉中使用了。
现实世界的存储,我们使用的工具和建模。每种数据结构有自己的优点和缺点,想想如果Google的数据用的是数组的存储,我们还能方便地查询到所需要的数据吗?而算法,在这么多的数据中如何做到最快的插入,查找,删除,也是在追求更快。
我们java是面向对象的语言,就好似自动档轿车,C语言好似手动档吉普。数据结构呢?是变速箱的工作原理。你完全可以不知道变速箱怎样工作,就把自动档的车子从 A点 开到 B点,而且未必就比懂得的人慢。写程序这件事,和开车一样,经验可以起到很大作用,但如果你不知道底层是怎么工作的,就永远只能开车,既不会修车,也不能造车。当然了,数据结构内容比较多,细细的学起来也是相对费功夫的,不可能达到一蹴而就。我们将常见的数据结构:堆栈、队列、数组、链表和红黑树 这几种给大家介绍一下,作为数据结构的入门,了解一下它们的特点即可。
2.2 常见的数据结构 数据存储的常用结构有:栈、队列、数组、链表和红黑树。我们分别来了解一下:
栈
栈 :stack ,又称堆栈,它是运算受限的线性表,其限制是仅允许在标的一端进行插入和删除操作,不允许在其他任何位置进行添加、查找、删除等操作。
简单的说:采用该结构的集合,对元素的存取有如下的特点
这里两个名词需要注意:
压栈 :就是存元素。即,把元素存储到栈的顶端位置,栈中已有元素依次向栈底方向移动一个位置。弹栈 :就是取元素。即,把栈的顶端位置元素取出,栈中已有元素依次向栈顶方向移动一个位置。
队列
队列 :queue ,简称队,它同堆栈一样,也是一种运算受限的线性表,其限制是仅允许在表的一端进行插入,而在表的另一端进行删除。
简单的说,采用该结构的集合,对元素的存取有如下的特点:
先进先出(即,存进去的元素,要在后它前面的元素依次取出后,才能取出该元素)。例如,小火车过山洞,车头先进去,车尾后进去;车头先出来,车尾后出来。
队列的入口、出口各占一侧。例如,下图中的左侧为入口,右侧为出口。
数组
数组 :Array ,是有序的元素序列,数组是在内存中开辟一段连续的空间,并在此空间存放元素。就像是一排出租屋,有100个房间,从001到100每个房间都有固定编号,通过编号就可以快速找到租房子的人。
简单的说,采用该结构的集合,对元素的存取有如下的特点:
查找元素快:通过索引,可以快速访问指定位置的元素
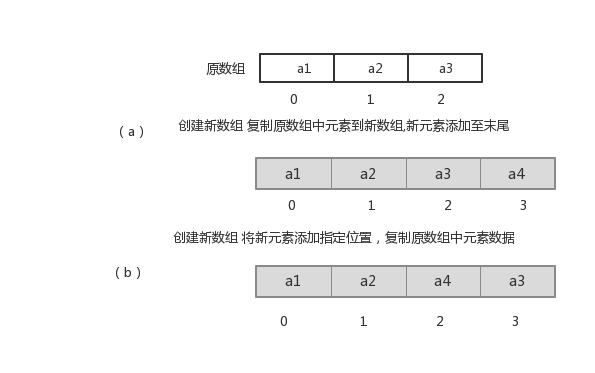
增删元素慢
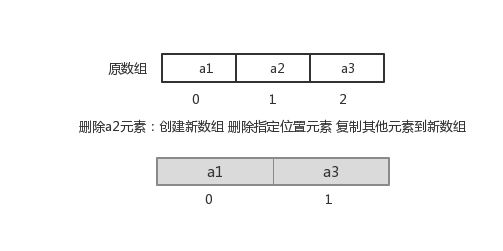
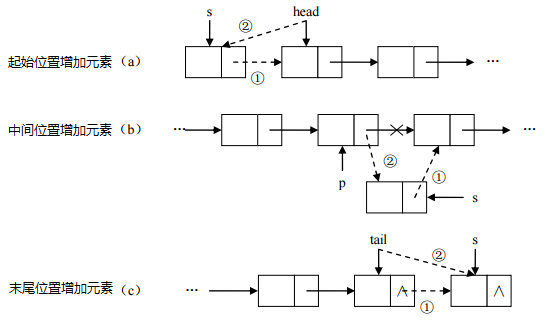
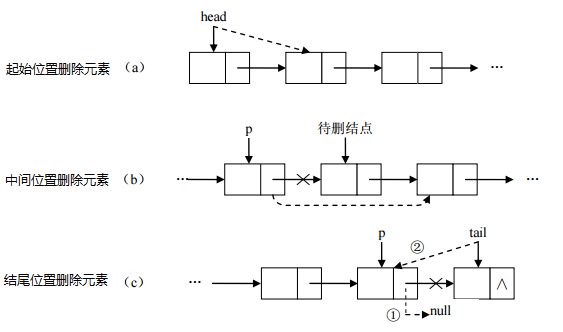
指定索引位置增加元素 :需要创建一个新数组,将指定新元素存储在指定索引位置,再把原数组元素根据索引,复制到新数组对应索引的位置。如下图指定索引位置删除元素: 需要创建一个新数组,把原数组元素根据索引,复制到新数组对应索引的位置,原数组中指定索引位置元素不复制到新数组中。如下图
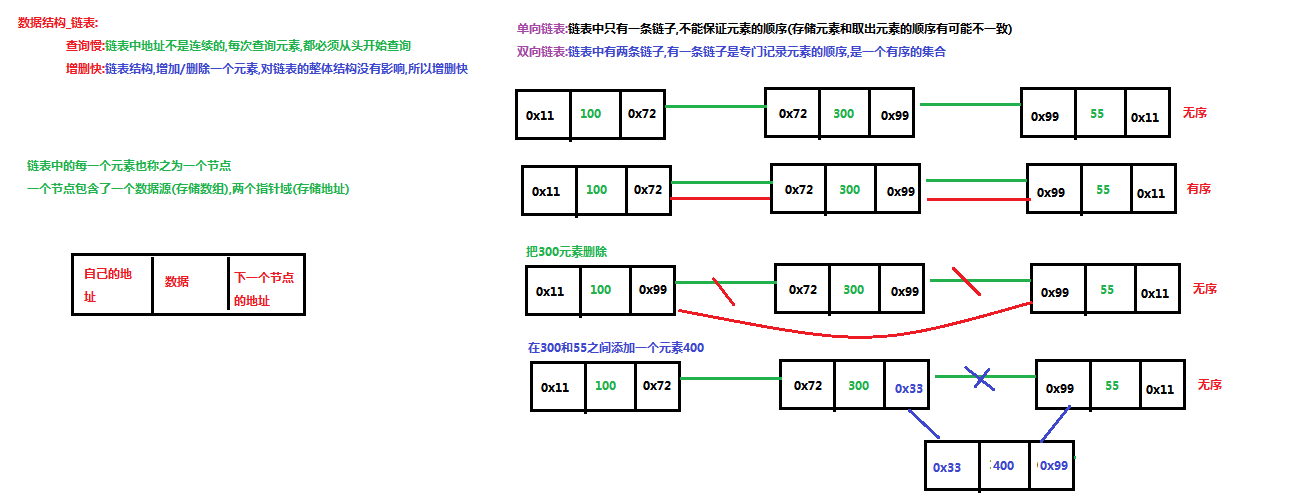
链表
简单的说,采用该结构的集合,对元素的存取有如下的特点:
红黑树
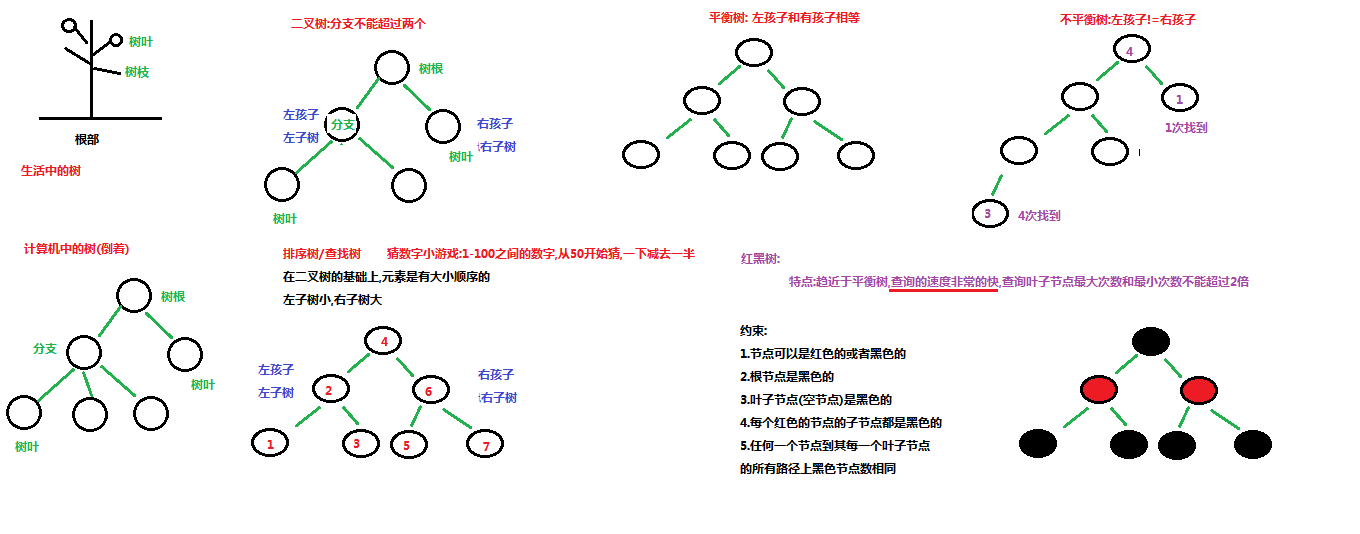
二叉树 :binary tree ,是每个结点不超过2的有序树(tree) 。
简单的理解,就是一种类似于我们生活中树的结构,只不过每个结点上都最多只能有两个子结点。
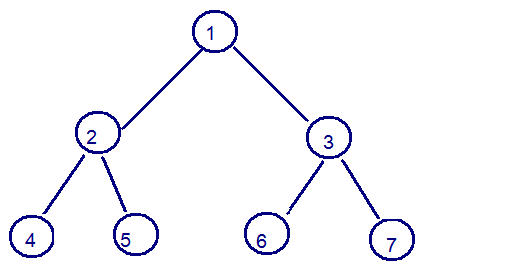
二叉树是每个节点最多有两个子树的树结构。顶上的叫根结点,两边被称作“左子树”和“右子树”。
如图:
我们要说的是二叉树的一种比较有意思的叫做红黑树 ,红黑树本身就是一颗二叉查找树,将节点插入后,该树仍然是一颗二叉查找树。也就意味着,树的键值仍然是有序的。
红黑树的约束:
节点可以是红色的或者黑色的
根节点是黑色的
叶子节点(特指空节点)是黑色的
每个红色节点的子节点都是黑色的
任何一个节点到其每一个叶子节点的所有路径上黑色节点数相同
红黑树的特点:
速度特别快,趋近平衡树,查找叶子元素最少和最多次数不多于二倍
第二章 List集合 我们掌握了Collection接口的使用后,再来看看Collection接口中的子类,他们都具备那些特性呢?
接下来,我们一起学习Collection中的常用几个子类(java.util.List集合、java.util.Set集合)。
1.1 List接口介绍 java.util.List接口继承自Collection接口,是单列集合的一个重要分支,习惯性地会将实现了List接口的对象称为List集合。在List集合中允许出现重复的元素,所有的元素是以一种线性方式进行存储的,在程序中可以通过索引来访问集合中的指定元素。另外,List集合还有一个特点就是元素有序,即元素的存入顺序和取出顺序一致。
看完API,我们总结一下:
List接口特点:
它是一个元素存取有序的集合。例如,存元素的顺序是11、22、33。那么集合中,元素的存储就是按照11、22、33的顺序完成的)。
它是一个带有索引的集合,通过索引就可以精确的操作集合中的元素(与数组的索引是一个道理)。
集合中可以有重复的元素,通过元素的equals方法,来比较是否为重复的元素。
tips:我们在基础班的时候已经学习过List接口的子类java.util.ArrayList类,该类中的方法都是来自List中定义。
1.2 List接口中常用方法 List作为Collection集合的子接口,不但继承了Collection接口中的全部方法,而且还增加了一些根据元素索引来操作集合的特有方法,如下:
public void add(int index, E element): 将指定的元素,添加到该集合中的指定位置上。public E get(int index):返回集合中指定位置的元素。public E remove(int index): 移除列表中指定位置的元素, 返回的是被移除的元素。public E set(int index, E element):用指定元素替换集合中指定位置的元素,返回值的更新前的元素。
List集合特有的方法都是跟索引相关,我们在基础班都学习过,那么我们再来复习一遍吧:
1
2
3
4
5
6
7
8
9
10
11
12
13
14
15
16
17
18
19
20
21
22
23
24
25
26
27
28
29
30
31
32
33
34
35
36
37
38
39
40
public class ListDemo public static void main (String[] args) List<String> list = new ArrayList<String>(); list.add("图图" ); list.add("小美" ); list.add("不高兴" ); System.out.println(list); list.add(1 ,"没头脑" ); System.out.println(list); System.out.println("删除索引位置为2的元素" ); System.out.println(list.remove(2 )); System.out.println(list); list.set(0 , "三毛" ); System.out.println(list); for (int i = 0 ;i<list.size();i++){ System.out.println(list.get(i)); } for (String string : list) { System.out.println(string); } } }
课上的demo
1
2
3
4
5
6
7
8
9
10
11
12
13
14
15
16
17
18
19
20
21
22
23
24
25
26
27
28
29
30
31
32
33
34
35
36
37
38
39
40
41
42
43
44
45
46
47
48
49
50
51
52
53
54
55
56
57
58
59
60
61
62
63
64
65
66
67
68
69
70
71
72
73
74
75
76
77
78
79
package com.itheima.demo01.List;import java.util.ArrayList;import java.util.Iterator;import java.util.List;public class Demo01List public static void main (String[] args) List<String> list = new ArrayList<>(); list.add("a" ); list.add("b" ); list.add("c" ); list.add("d" ); list.add("a" ); System.out.println(list); list.add(3 ,"itheima" ); System.out.println(list); String removeE = list.remove(2 ); System.out.println("被移除的元素:" +removeE); System.out.println(list); String setE = list.set(4 , "A" ); System.out.println("被替换的元素:" +setE); System.out.println(list); for (int i=0 ; i<list.size(); i++){ String s = list.get(i); System.out.println(s); } System.out.println("-----------------" ); Iterator<String> it = list.iterator(); while (it.hasNext()){ String s = it.next(); System.out.println(s); } System.out.println("-----------------" ); for (String s : list) { System.out.println(s); } String r = list.get(5 ); System.out.println(r); } }
第三章 List的子类 3.1 ArrayList集合 java.util.ArrayList集合数据存储的结构是数组结构。元素增删慢,查找快,由于日常开发中使用最多的功能为查询数据、遍历数据,所以ArrayList是最常用的集合。
许多程序员开发时非常随意地使用ArrayList完成任何需求,并不严谨,这种用法是不提倡的。
去看源码!!!复制->增删慢
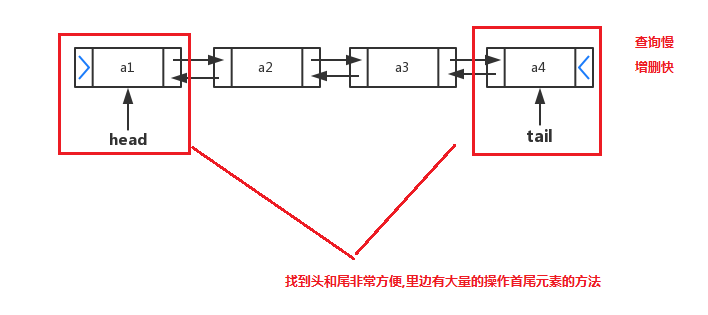
3.2 LinkedList集合 java.util.LinkedList集合数据存储的结构是链表结构。方便元素添加、删除的集合。
LinkedList是一个双向链表,那么双向链表是什么样子的呢,我们用个图了解下
实际开发中对一个集合元素的添加与删除经常涉及到首尾操作,而LinkedList提供了大量首尾操作的方法。这些方法我们作为了解即可:
public void addFirst(E e):将指定元素插入此列表的开头。public void addLast(E e):将指定元素添加到此列表的结尾。public E getFirst():返回此列表的第一个元素。public E getLast():返回此列表的最后一个元素。public E removeFirst():移除并返回此列表的第一个元素。public E removeLast():移除并返回此列表的最后一个元素。public E pop():从此列表所表示的堆栈处弹出一个元素。public void push(E e):将元素推入此列表所表示的堆栈。public boolean isEmpty():如果列表不包含元素,则返回true。
LinkedList是List的子类,List中的方法LinkedList都是可以使用,这里就不做详细介绍,我们只需要了解LinkedList的特有方法即可。在开发时,LinkedList集合也可以作为堆栈,队列的结构使用。(了解即可)
方法演示:
1
2
3
4
5
6
7
8
9
10
11
12
13
14
15
16
17
18
19
20
21
22
public class LinkedListDemo public static void main (String[] args) LinkedList<String> link = new LinkedList<String>(); link.addFirst("abc1" ); link.addFirst("abc2" ); link.addFirst("abc3" ); System.out.println(link); System.out.println(link.getFirst()); System.out.println(link.getLast()); System.out.println(link.removeFirst()); System.out.println(link.removeLast()); while (!link.isEmpty()) { System.out.println(link.pop()); } System.out.println(link); } }
课上的demo
1
2
3
4
5
6
7
8
9
10
11
12
13
14
15
16
17
18
19
20
21
22
23
24
25
26
27
28
29
30
31
32
33
34
35
36
37
38
39
40
41
42
43
44
45
46
47
48
49
50
51
52
53
54
55
56
57
58
59
60
61
62
63
64
65
66
67
68
69
70
71
72
73
74
75
76
77
78
79
80
81
82
83
84
85
86
87
88
89
90
91
92
93
94
95
96
97
98
99
package com.itheima.demo01.List;import java.util.LinkedList;public class Demo02LinkedList public static void main (String[] args) show03(); } private static void show03 () LinkedList<String> linked = new LinkedList<>(); linked.add("a" ); linked.add("b" ); linked.add("c" ); System.out.println(linked); String first = linked.pop(); System.out.println("被移除的第一个元素:" +first); String last = linked.removeLast(); System.out.println("被移除的最后一个元素:" +last); System.out.println(linked); } private static void show02 () LinkedList<String> linked = new LinkedList<>(); linked.add("a" ); linked.add("b" ); linked.add("c" ); if (!linked.isEmpty()){ String first = linked.getFirst(); System.out.println(first); String last = linked.getLast(); System.out.println(last); } } private static void show01 () LinkedList<String> linked = new LinkedList<>(); linked.add("a" ); linked.add("b" ); linked.add("c" ); System.out.println(linked); linked.push("www" ); System.out.println(linked); linked.addLast("com" ); System.out.println(linked); } }
第四章 Set接口 java.util.Set接口和java.util.List接口一样,同样继承自Collection接口,它与Collection接口中的方法基本一致,并没有对Collection接口进行功能上的扩充,只是比Collection接口更加严格了。与List接口不同的是,Set接口中元素无序,并且都会以某种规则保证存入的元素不出现重复。
Set集合有多个子类,这里我们介绍其中的java.util.HashSet、java.util.LinkedHashSet这两个集合。
tips:Set集合取出元素的方式可以采用:迭代器、增强for。
课上的demo
1
2
3
4
5
6
7
8
9
10
11
12
13
14
15
16
17
18
19
20
21
22
23
24
25
26
27
28
29
30
31
32
33
34
35
36
37
38
39
package com.itheima.demo02.Set;import java.util.HashSet;import java.util.Iterator;import java.util.Set;public class Demo01Set public static void main (String[] args) Set<Integer> set = new HashSet<>(); set.add(1 ); set.add(3 ); set.add(2 ); set.add(1 ); Iterator<Integer> it = set.iterator(); while (it.hasNext()){ Integer n = it.next(); System.out.println(n); } System.out.println("-----------------" ); for (Integer i : set) { System.out.println(i); } } }
3.1 HashSet集合介绍 java.util.HashSet是Set接口的一个实现类,它所存储的元素是不可重复的,并且元素都是无序的(即存取顺序不一致)。java.util.HashSet底层的实现其实是一个java.util.HashMap支持,由于我们暂时还未学习,先做了解。
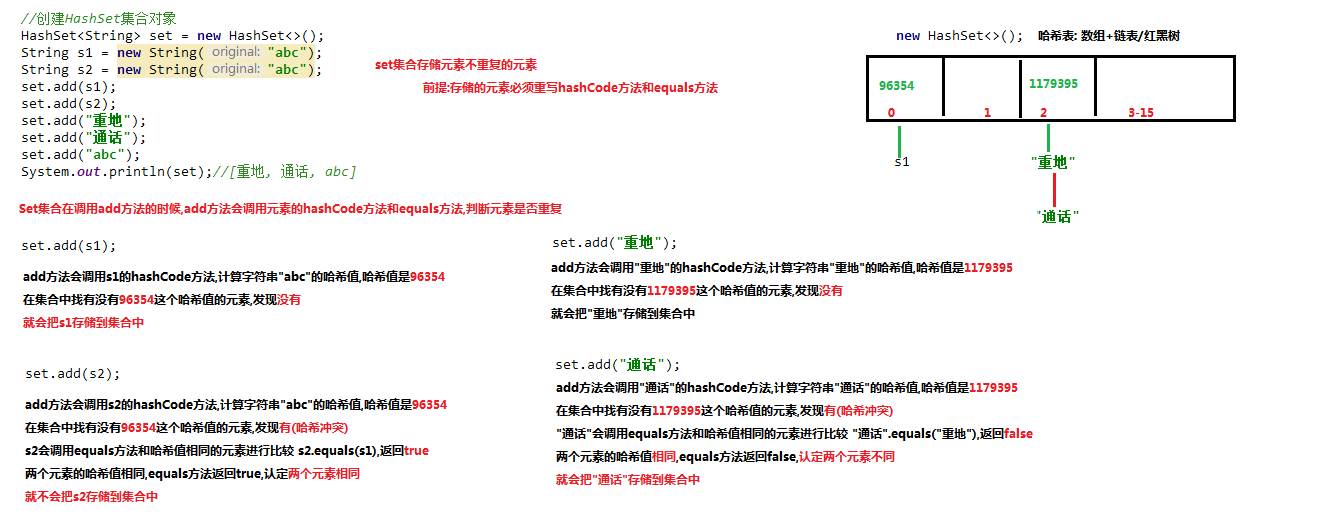
HashSet是根据对象的哈希值来确定元素在集合中的存储位置,因此具有良好的存取和查找性能。保证元素唯一性的方式依赖于:hashCode与equals方法。
我们先来使用一下Set集合存储,看下现象,再进行原理的讲解:
1
2
3
4
5
6
7
8
9
10
11
12
13
14
15
16
public class HashSetDemo public static void main (String[] args) HashSet<String> set = new HashSet<String>(); set.add(new String("cba" )); set.add("abc" ); set.add("bac" ); set.add("cba" ); for (String name : set) { System.out.println(name); } } }
输出结果如下,说明集合中不能存储重复元素:
tips:根据结果我们发现字符串”cba”只存储了一个,也就是说重复的元素set集合不存储。
哈希值 课上demo
1 2 3 4 5 6 7 8 9 10 11 12 13 14 15 16 17 18 19 20 21 22 23 24 25 26 27 28 29 30 31 32 33 34 35 36 37 38 39 40 41 package com.itheima.demo03.hashCode;public class Demo01HashCode public static void main (String[] args) Person p1 = new Person(); int h1 = p1.hashCode(); System.out.println(h1); Person p2 = new Person(); int h2 = p2.hashCode(); System.out.println(h2); System.out.println(p1); System.out.println(p2); System.out.println(p1==p2); String s1 = new String("abc" ); String s2 = new String("abc" ); System.out.println(s1.hashCode()); System.out.println(s2.hashCode()); System.out.println("重地" .hashCode()); System.out.println("通话" .hashCode()); } }
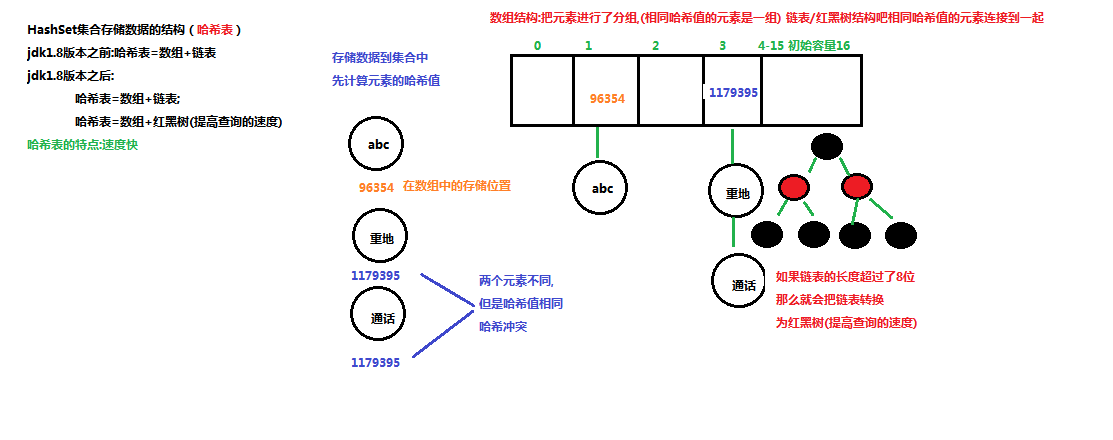
2.2 HashSet集合存储数据的结构(哈希表) 什么是哈希表呢?
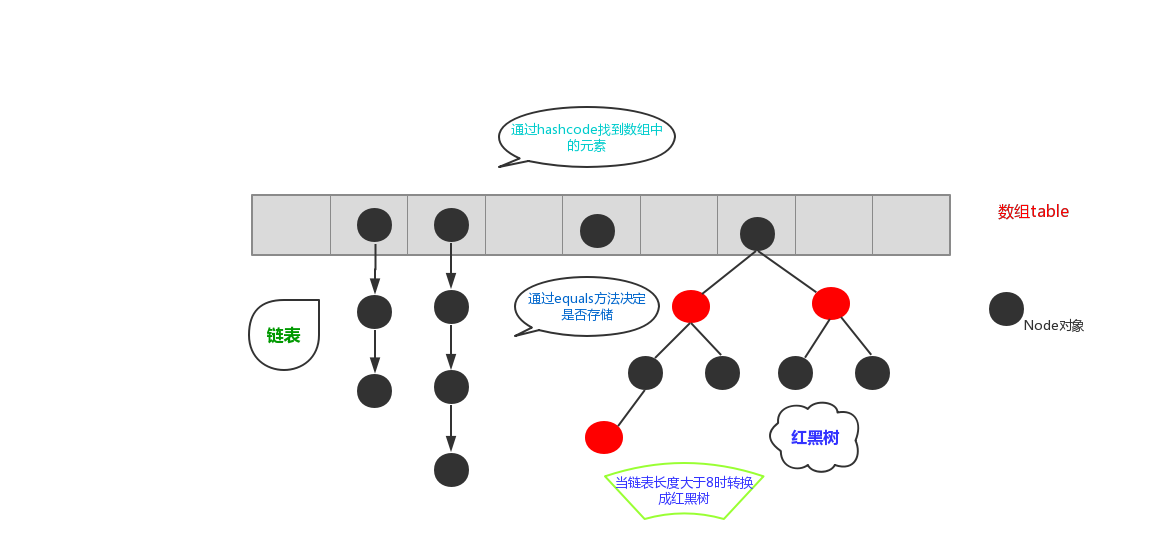
在JDK1.8 之前,哈希表底层采用数组+链表实现,即使用链表处理冲突,同一hash值的链表都存储在一个链表里。但是当位于一个桶中的元素较多,即hash值相等的元素较多时,通过key值依次查找的效率较低。而JDK1.8中,哈希表存储采用数组+链表+红黑树实现,当链表长度超过阈值(8)时,将链表转换为红黑树,这样大大减少了查找时间。
简单的来说,哈希表是由数组+链表+红黑树(JDK1.8增加了红黑树部分)实现的,如下图所示。
看到这张图就有人要问了,这个是怎么存储的呢?
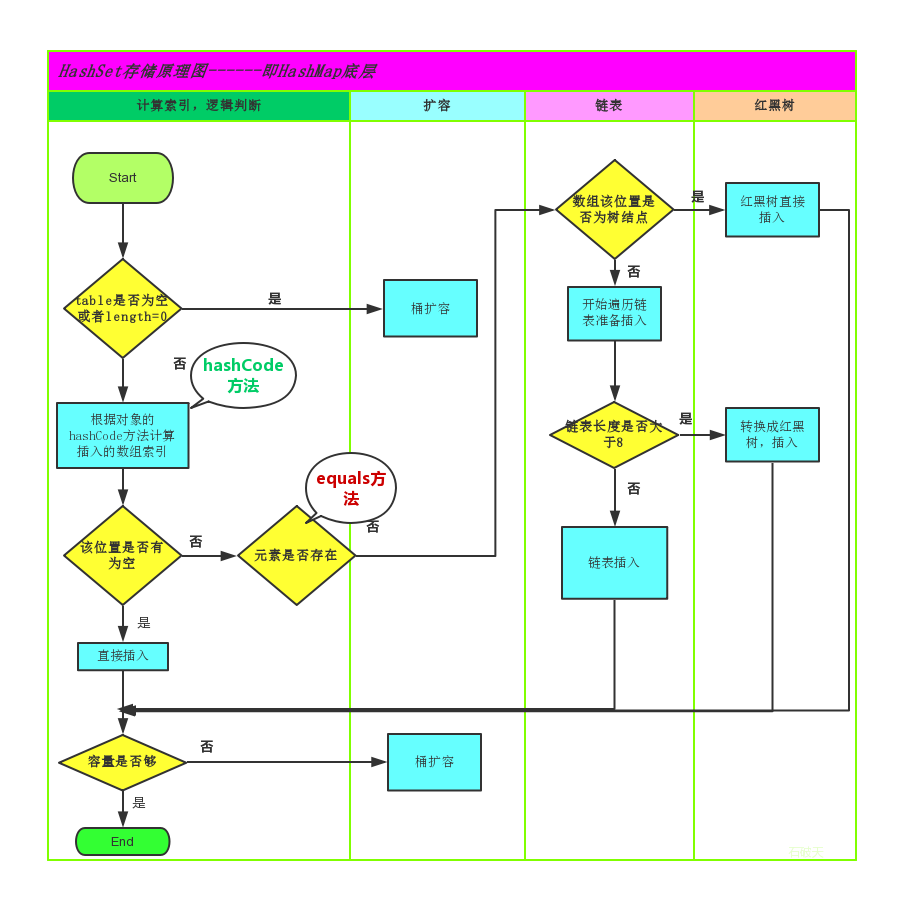
为了方便大家的理解我们结合一个存储流程图来说明一下:
总而言之,JDK1.8 引入红黑树大程度优化了HashMap的性能,那么对于我们来讲保证HashSet集合元素的唯一,其实就是根据对象的hashCode和equals方法来决定的。如果我们往集合中存放自定义的对象,那么保证其唯一,就必须复写hashCode和equals方法建立属于当前对象的比较方式。
2.3 HashSet存储自定义类型元素 给HashSet中存放自定义类型元素时,需要重写对象中的hashCode和equals方法,建立自己的比较方式,才能保证HashSet集合中的对象唯一
创建自定义Student类
1 2 3 4 5 6 7 8 9 10 11 12 13 14 15 16 17 18 19 20 21 22 23 24 25 26 27 28 29 30 31 32 33 34 35 36 37 38 39 40 41 42 43 44 public class Student private String name; private int age; public Student () } public Student (String name, int age) this .name = name; this .age = age; } public String getName () return name; } public void setName (String name) this .name = name; } public int getAge () return age; } public void setAge (int age) this .age = age; } @Override public boolean equals (Object o) if (this == o) return true ; if (o == null || getClass() != o.getClass()) return false ; Student student = (Student) o; return age == student.age && Objects.equals(name, student.name); } @Override public int hashCode () return Objects.hash(name, age); } }
1 2 3 4 5 6 7 8 9 10 11 12 13 14 15 16 17 18 19 20 21 public class HashSetDemo2 public static void main (String[] args) HashSet<Student> stuSet = new HashSet<Student>(); Student stu = new Student("于谦" , 43 ); stuSet.add(stu); stuSet.add(new Student("郭德纲" , 44 )); stuSet.add(new Student("于谦" , 43 )); stuSet.add(new Student("郭麒麟" , 23 )); stuSet.add(stu); for (Student stu2 : stuSet) { System.out.println(stu2); } } } 执行结果: Student [name=郭德纲, age=44 ] Student [name=于谦, age=43 ] Student [name=郭麒麟, age=23 ]
2.3 LinkedHashSet 我们知道HashSet保证元素唯一,可是元素存放进去是没有顺序的,那么我们要保证有序,怎么办呢?
在HashSet下面有一个子类java.util.LinkedHashSet,它是链表和哈希表组合的一个数据存储结构。
演示代码如下:
1 2 3 4 5 6 7 8 9 10 11 12 13 14 15 16 17 18 public class LinkedHashSetDemo public static void main (String[] args) Set<String> set = new LinkedHashSet<String>(); set.add("bbb" ); set.add("aaa" ); set.add("abc" ); set.add("bbc" ); Iterator<String> it = set.iterator(); while (it.hasNext()) { System.out.println(it.next()); } } } 结果: bbb aaa abc bbc
demo in class
1 2 3 4 5 6 7 8 9 10 11 12 13 14 15 16 17 18 19 20 21 22 23 24 25 26 27 package com.itheima.demo02.Set;import java.util.HashSet;import java.util.LinkedHashSet;public class Demo04LinkedHashSet public static void main (String[] args) HashSet<String> set = new HashSet<>(); set.add("www" ); set.add("abc" ); set.add("abc" ); set.add("itcast" ); System.out.println(set); LinkedHashSet<String> linked = new LinkedHashSet<>(); linked.add("www" ); linked.add("abc" ); linked.add("abc" ); linked.add("itcast" ); System.out.println(linked); } }
1.9 可变参数 在JDK1.5 之后,如果我们定义一个方法需要接受多个参数,并且多个参数类型一致,我们可以对其简化成如下格式:
1 修饰符 返回值类型 方法名(参数类型... 形参名){ }
其实这个书写完全等价与
1 修饰符 返回值类型 方法名(参数类型[] 形参名){ }
只是后面这种定义,在调用时必须传递数组,而前者可以直接传递数据即可。
JDK1.5 以后。出现了简化操作。**…** 用在参数上,称之为可变参数。
同样是代表数组,但是在调用这个带有可变参数的方法时,不用创建数组(这就是简单之处),直接将数组中的元素作为实际参数进行传递,其实编译成的class文件,将这些元素先封装到一个数组中,在进行传递。这些动作都在编译.class文件时,自动完成了。
1 2 3 4 public static void method (Object...obj) }
代码演示:
1 2 3 4 5 6 7 8 9 10 11 12 13 14 15 16 17 18 19 20 21 22 23 24 25 26 27 28 29 30 31 32 public class ChangeArgs public static void main (String[] args) int [] arr = { 1 , 4 , 62 , 431 , 2 }; int sum = getSum(arr); System.out.println(sum); int sum2 = getSum(6 , 7 , 2 , 12 , 2121 ); System.out.println(sum2); } public static int getSum (int ... arr) int sum = 0 ; for (int a : arr) { sum += a; } return sum; } }
tips: 上述add方法在同一个类中,只能存在一个。因为会发生调用的不确定性
注意:如果在方法书写时,这个方法拥有多参数,参数中包含可变参数,可变参数一定要写在参数列表的末尾位置。
demo in class
1 2 3 4 5 6 7 8 9 10 11 12 13 14 15 16 17 18 19 20 21 22 23 24 25 26 27 28 29 30 31 32 33 34 35 36 37 38 39 40 41 42 43 44 45 46 47 48 49 50 51 52 53 54 55 56 57 58 59 60 61 62 63 64 65 66 67 68 69 70 71 72 73 package com.itheima.demo04.VarArgs;public class Demo01VarArgs public static void main (String[] args) int i = add(10 ,20 ); System.out.println(i); method("abc" ,5.5 ,10 ,1 ,2 ,3 ,4 ); } public static void method (Object...obj) } public static int add (int ...arr) int sum = 0 ; for (int i : arr) { sum += i; } return sum; } }
第五章 Collections 2.1 常用功能
java.utils.Collections是集合工具类,用来对集合进行操作。部分方法如下:
public static <T> boolean addAll(Collection<T> c, T... elements) :往集合中添加一些元素。public static void shuffle(List<?> list) 打乱顺序:打乱集合顺序。public static <T> void sort(List<T> list):将集合中元素按照默认规则排序。public static <T> void sort(List<T> list,Comparator<? super T> ):将集合中元素按照指定规则排序。
代码演示:
1 2 3 4 5 6 7 8 9 10 11 12 13 14 15 16 17 18 19 public class CollectionsDemo public static void main (String[] args) ArrayList<Integer> list = new ArrayList<Integer>(); Collections.addAll(list, 5 , 222 , 1 ,2 ); System.out.println(list); Collections.sort(list); System.out.println(list); } } 结果: [5 , 222 , 1 , 2 ] [1 , 2 , 5 , 222 ]
代码演示之后 ,发现我们的集合按照顺序进行了排列,可是这样的顺序是采用默认的顺序,如果想要指定顺序那该怎么办呢?
我们发现还有个方法没有讲,public static <T> void sort(List<T> list,Comparator<? super T> ):将集合中元素按照指定规则排序。接下来讲解一下指定规则的排列。
demo in class
1 2 3 4 5 6 7 8 9 10 11 12 13 14 15 16 17 18 19 20 21 22 23 24 25 26 27 28 29 30 package com.itheima.demo05.Collections;import java.util.ArrayList;import java.util.Collections;public class Demo01Collections public static void main (String[] args) ArrayList<String> list = new ArrayList<>(); Collections.addAll(list,"a" ,"b" ,"c" ,"d" ,"e" ); System.out.println(list); Collections.shuffle(list); System.out.println(list); } }
2.2 Comparator比较器 我们还是先研究这个方法
public static <T> void sort(List<T> list):将集合中元素按照默认规则排序。
不过这次存储的是字符串类型。
1 2 3 4 5 6 7 8 9 10 11 12 public class CollectionsDemo2 public static void main (String[] args) ArrayList<String> list = new ArrayList<String>(); list.add("cba" ); list.add("aba" ); list.add("sba" ); list.add("nba" ); Collections.sort(list); System.out.println(list); } }
结果:
我们使用的是默认的规则完成字符串的排序,那么默认规则是怎么定义出来的呢?
说到排序了,简单的说就是两个对象之间比较大小,那么在JAVA中提供了两种比较实现的方式,一种是比较死板的采用java.lang.Comparable接口去实现,一种是灵活的当我需要做排序的时候在去选择的java.util.Comparator接口完成。
那么我们采用的public static <T> void sort(List<T> list)这个方法完成的排序,实际上要求了被排序的类型需要实现Comparable接口完成比较的功能,在String类型上如下:
1 public final class String implements java .io .Serializable , Comparable <String >, CharSequence
String类实现了这个接口,并完成了比较规则的定义,但是这样就把这种规则写死了,那比如我想要字符串按照第一个字符降序排列,那么这样就要修改String的源代码,这是不可能的了,那么这个时候我们可以使用
public static <T> void sort(List<T> list,Comparator<? super T> )方法灵活的完成,这个里面就涉及到了Comparator这个接口,位于位于java.util包下,排序是comparator能实现的功能之一,该接口代表一个比较器,比较器具有可比性!顾名思义就是做排序的,通俗地讲需要比较两个对象谁排在前谁排在后,那么比较的方法就是:
操作如下:
1 2 3 4 5 6 7 8 9 10 11 12 13 14 15 16 17 public class CollectionsDemo3 public static void main (String[] args) ArrayList<String> list = new ArrayList<String>(); list.add("cba" ); list.add("aba" ); list.add("sba" ); list.add("nba" ); Collections.sort(list, new Comparator<String>() { @Override public int compare (String o1, String o2) return o2.charAt(0 ) - o1.charAt(0 ); } }); System.out.println(list); } }
结果如下:
demo in class
1 2 3 4 5 6 7 8 9 10 11 12 13 14 15 16 17 18 19 20 21 22 23 24 25 26 27 28 29 30 31 32 33 34 35 36 37 38 39 40 41 42 43 44 45 46 47 48 49 50 51 52 53 54 55 56 57 58 59 60 61 62 63 64 65 66 67 68 69 70 71 72 73 74 75 76 77 78 79 80 81 82 83 84 85 86 87 88 89 90 91 92 93 94 95 96 97 98 package com.itheima.demo05.Collections;import java.util.ArrayList;import java.util.Collections;class Demo02Sort public static void main (String[] args) ArrayList<Integer> list01 = new ArrayList<>(); list01.add(1 ); list01.add(3 ); list01.add(2 ); System.out.println(list01); Collections.sort(list01); System.out.println(list01); ArrayList<String> list02 = new ArrayList<>(); list02.add("a" ); list02.add("c" ); list02.add("b" ); System.out.println(list02); Collections.sort(list02); System.out.println(list02); ArrayList<Person> list03 = new ArrayList<>(); list03.add(new Person("张三" ,18 )); list03.add(new Person("李四" ,20 )); list03.add(new Person("王五" ,15 )); System.out.println(list03); Collections.sort(list03); System.out.println(list03); } } package com.itheima.demo05.Collections;public class Person implements Comparable <Person > private String name; private int age; public Person () } public Person (String name, int age) this .name = name; this .age = age; } @Override public String toString () return "Person{" + "name='" + name + '\'' + ", age=" + age + '}' ; } public String getName () return name; } public void setName (String name) this .name = name; } public int getAge () return age; } public void setAge (int age) this .age = age; } @Override public int compareTo (Person o) return o.getAge() - this .getAge(); } }
2.3 简述Comparable和Comparator两个接口的区别。 Comparable :强行对实现它的每个类的对象进行整体排序。这种排序被称为类的自然排序,类的compareTo方法被称为它的自然比较方法。只能在类中实现compareTo()一次,不能经常修改类的代码实现自己想要的排序。实现此接口的对象列表(和数组)可以通过Collections.sort(和Arrays.sort)进行自动排序,对象可以用作有序映射中的键或有序集合中的元素,无需指定比较器。
Comparator 强行对某个对象进行整体排序。可以将Comparator 传递给sort方法(如Collections.sort或 Arrays.sort),从而允许在排序顺序上实现精确控制。还可以使用Comparator来控制某些数据结构(如有序set或有序映射)的顺序,或者为那些没有自然顺序的对象collection提供排序。
1 2 3 4 5 6 7 8 9 10 11 12 13 14 15 16 17 18 19 20 21 22 23 24 25 26 27 28 29 30 31 32 33 34 35 36 37 38 39 40 41 42 43 44 45 46 47 48 49 50 51 52 53 54 55 56 57 58 59 60 61 62 63 64 65 66 67 68 69 70 71 72 73 74 75 76 77 78 79 80 81 82 83 84 85 86 87 88 89 90 91 92 93 94 95 96 97 98 99 100 101 102 103 104 105 106 107 108 109 110 package com.itheima.demo05.Collections;import java.util.ArrayList;import java.util.Collections;import java.util.Comparator;public class Demo03Sort public static void main (String[] args) ArrayList<Integer> list01 = new ArrayList<>(); list01.add(1 ); list01.add(3 ); list01.add(2 ); System.out.println(list01); Collections.sort(list01, new Comparator<Integer>() { @Override public int compare (Integer o1, Integer o2) return o2-o1; } }); System.out.println(list01); ArrayList<Student> list02 = new ArrayList<>(); list02.add(new Student("a迪丽热巴" ,18 )); list02.add(new Student("古力娜扎" ,20 )); list02.add(new Student("杨幂" ,17 )); list02.add(new Student("b杨幂" ,18 )); System.out.println(list02); Collections.sort(list02, new Comparator<Student>() { @Override public int compare (Student o1, Student o2) int result = o1.getAge()-o2.getAge(); if (result==0 ){ result = o1.getName().charAt(0 )-o2.getName().charAt(0 ); } return result; } }); System.out.println(list02); } } package com.itheima.demo05.Collections;public class Student private String name; private int age; public Student () } public Student (String name, int age) this .name = name; this .age = age; } @Override public String toString () return "Student{" + "name='" + name + '\'' + ", age=" + age + '}' ; } public String getName () return name; } public void setName (String name) this .name = name; } public int getAge () return age; } public void setAge (int age) this .age = age; } }
2.4 练习 创建一个学生类,存储到ArrayList集合中完成指定排序操作。
Student 初始类
1 2 3 4 5 6 7 8 9 10 11 12 13 14 15 16 17 18 19 20 21 22 23 24 25 26 27 28 29 30 31 32 33 34 35 36 public class Student private String name; private int age; public Student () } public Student (String name, int age) this .name = name; this .age = age; } public String getName () return name; } public void setName (String name) this .name = name; } public int getAge () return age; } public void setAge (int age) this .age = age; } @Override public String toString () return "Student{" + "name='" + name + '\'' + ", age=" + age + '}' ; } }
测试类:
1 2 3 4 5 6 7 8 9 10 11 12 13 14 15 16 17 18 19 20 21 22 23 24 25 26 public class Demo public static void main (String[] args) ArrayList<Student> list = new ArrayList<Student>(); list.add(new Student("rose" ,18 )); list.add(new Student("jack" ,16 )); list.add(new Student("abc" ,16 )); list.add(new Student("ace" ,17 )); list.add(new Student("mark" ,16 )); for (Student student : list) { System.out.println(student); } } }
发现,当我们调用Collections.sort()方法的时候 程序报错了。
原因:如果想要集合中的元素完成排序,那么必须要实现比较器Comparable接口。
于是我们就完成了Student类的一个实现,如下:
1 2 3 4 5 6 7 public class Student implements Comparable <Student > .... @Override public int compareTo (Student o) return this .age-o.age; } }
再次测试,代码就OK 了效果如下:
1 2 3 4 5 Student{name='jack' , age=16 } Student{name='abc' , age=16 } Student{name='mark' , age=16 } Student{name='ace' , age=17 } Student{name='rose' , age=18 }
2.5 扩展 如果在使用的时候,想要独立的定义规则去使用 可以采用Collections.sort(List list,Comparetor<T> c)方式,自己定义规则:
1 2 3 4 5 6 Collections.sort(list, new Comparator<Student>() { @Override public int compare (Student o1, Student o2) return o2.getAge()-o1.getAge(); } });
效果:
1 2 3 4 5 Student{name='rose', age=18} Student{name='ace', age=17} Student{name='jack', age=16} Student{name='abc', age=16} Student{name='mark', age=16}
如果想要规则更多一些,可以参考下面代码:
1 2 3 4 5 6 7 8 9 10 11 12 13 Collections.sort(list, new Comparator<Student>() { @Override public int compare (Student o1, Student o2) int result = o2.getAge()-o1.getAge(); if (result==0 ){ result = o1.getName().charAt(0 )-o2.getName().charAt(0 ); } return result; } });
效果如下:
1 2 3 4 5 Student{name='rose', age=18} Student{name='ace', age=17} Student{name='abc', age=16} Student{name='jack', age=16} Student{name='mark', age=16}
